It’s so easy to get overwhelmed with the power of a distributed VCS (DVCS) like Git or Mercurial. One might be tempted to ask the Internet for the one true way of using it, only to be thrown a few blog posts later by the amount of “YMMV” disclaimers. A classic example of the fact is the merge vs rebase dispute. Sadly, I’m not going to solve these problems once and for all. I believe that variety is beautiful, so I’ll just add fuel to the fire instead by detailing my favourite Mercurial workflow.
To give credit where it’s due, I got the first nudge to develop this workflow from the tried and trusted Git branching model. Another source of inspiration for this was Andy Mehalick’s blog. The reason that made me improve upon that was that I felt Mercurial’s named branches shouldn’t be used in the same way as Git branches, which, for one, is against the Mercurial designers’ intent and, furthermore, is counterintuitive.
After couple of evenings of drawing graphs, considering corner cases and consulting Mercurial’s manpages I came up with a version that worked for me on paper. As is usually the case, it had too many ‘features’. Below I give you a slimmed down version, which has gone through a trial by fire during a small project. I’m itching to try it out on a bigger one!
Desired features.
Commits making up a feature shall be easily discernible in the history view. The starting point off which the development started should be preserved. That means merging is preferred to rebasing.
At any given time, there shall be a commit marking the latest development version, where the contributors can start new work from.
The maintainers’ workflow shall not affect the contributors’. Pull requests are the ‘interface’ to enforce that.
Upsides
Good visibility into the history of development process.
Few rules for well-formed pull requests, which means that the burden of keeping the repo in shape falls upon maintainers, not contributors.
Fairly simple structure - processes can be scripted.
Downsides
All the pull requests must come from
stagingso maintainers can pull from a contributor’s repo directly. Not necessary when patches sent in via mail though.Tagging and bookmarking involves a few steps which have to be muscle-memorised or encapsulated into a Mercurial extension.
Repository structure
Without further ado, here’s how the repo is structured.
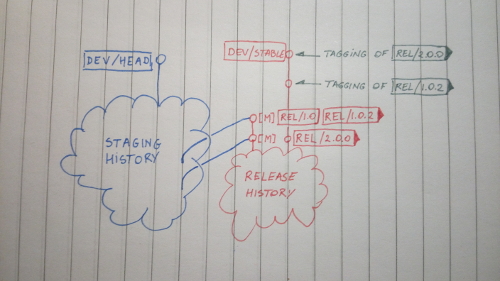
releasebranch.This is where all the work for the next release is tracked. Only tested commits are allowed to be merged in. Contains only released code and backported fixes.
For easier navigation, the following tags and bookmarks are introduced:
dev/stablebookmark always marks the latest stable commit. This is the candidate for release.rel/x.y[.z]tags mark release commits.rel/x.ybookmarks mark heads of release branches.
stagingbranch.The
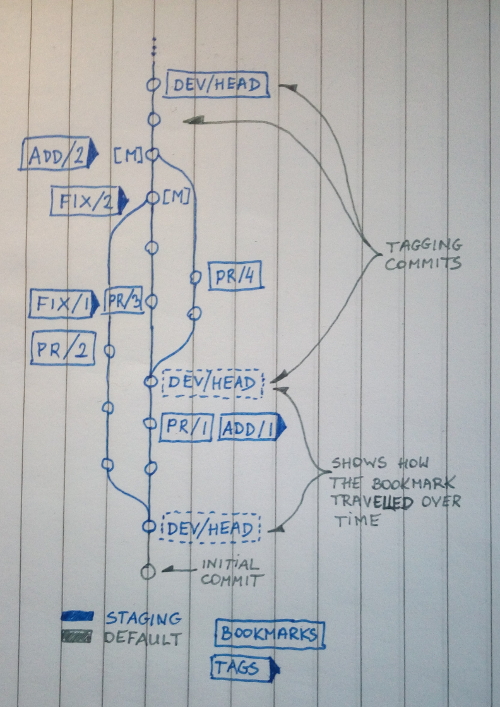
stagingbranch is where all the pull requests get merged to and queued for testing in the CI system. When a patch is accepted here, the contributor shall not rebase that line of work against a newer head ofstagingunless explicitly requested by a maintainer, which ideally should never happen. Once the tests turn green, head of the feature branch is merged with thedev/headbookmark.The following tags and bookmarks make navigation easier:
dev/headbookmark.Tracks latest tested development version. This is the base for any new development.
add/[###-]...tags.Mark where a new feature. Merged one by one to
dev/stable. Optional ### indicates the issue number, if the feature was requested.fix/###tags.Mark the fixes that should be backported to
rel/...bookmarks. Mandatory ### incdicates the bug report number.
Processes
This serves as a cheat sheet for me and the rest of the team. In my opinion, it lends itself nicely to being codified in the form of a Mercurial extension.
Evaulating pull requests
We assume here that the request is well formed. In particular, that it was made from the staging branch.
Create a new repo clone if you haven’t already done so. This is important. Don’t mix your development with others’ pull requests.
 #!bash
 $ cd dir && hg clone ...
Pull changes from the fork and take note of the new tip id it creates. We’ll
refer to it as pr_head.
 #!bash
 $ hg pull -b staging ...
If the patch creates a new head, try merging it with dev/head. If the
merge comes out clean, proceed. Otherwise abort it and notify the
contributor.
 #!bash
 $ hg up -r $(hg id -r dev/head | cut -d’ ‘ -f1) # updating to a specific id makes sure that *`dev/head`* bookmark remains inactive
 $ hg merge $(pr_head) || hg up -C dev/head # in case the merge fails, activate the bookmark again
Update the working copy and review the changes. Should you decide the quality is sub-par, get back to the contributor with a list of issues to fix. Push the code to upstream to schedule the testing crucible run.
Tests red: contributor will be notified, wait for a revised patch.
Tests green: Mark the tip of pull request (staging_head) with add/... or
‘fix/…’ tag, so it can be referred to easily later on. Update the
dev/head bookmark to the tagging commit and push to upstream, so new
development branches off this point.
 #!bash
 $ hg tag -r $(staging_head) fix/234-memleak-adc-sad-path-msp430
 $ hg bookmark dev/head -r fix/234-memleak-adc-sad-path-msp430 -f
 $ hg push -B dev/head ...
Merging tested features
When a feature has been confirmed working, it is ready to be merged to the stable codebase.
#!bash
$ hg up dev/stable
$ hg merge add/crc-check-radio-rx
$ hg commit -m ‘feature: crc-check-radio-rx’
When it’s a security or critical fix, it has to be merged into appropriate releases as well. Discuss with the team whether it necessitates a new patch release immediately.
#!bash
$ hg up rel/1.2.3
$ hg merge fix/234-memleak-adc-sad-path-msp430
Resolve all the conflicts and commit.
#!bash
$ hg commit -m ‘hotfix: memleak-adc-sad-path-msp430’
Optionally create a new release.
#!bash
$ hg tag rel/1.2.4
Worked example
To visualise things better, here are two diagrams of a repo. Together with the comments on them, I think they are pretty self-explanatory.

Release branch evolution example.

Staging branch evolution example.
Final notes
My main grief with this workflow is that it requires quite a bit of tagging and bookmark shuffling. As I already stated, this can and will be automated. Stay tuned for an update on that.
As always, I’m happy to hear your thoughts on this. Feel free to take this model for a ride, break it and share the experience.